


ProfessionalCommunity Edition
Proxy settings
-
Last updated: June 18, 2026
-
Read time: 12 Minutes
The Proxy page in the Settings dialog contains settings for the following:
- Proxy listeners.
- Request and response interception rules.
- WebSocket interception rules.
- Response modification rules.
- HTTP and WebSocket match and replace rules.
- TLS pass through.
- Default Proxy history message display.
- Proxy history logging.
- Default Proxy interception state.
- Miscellaneous.
Proxy listeners
A proxy listener is a local HTTP proxy server that listens for incoming connections from the browser. It enables you to monitor and intercept all requests and responses.
By default, Burp creates a single listener on port 8080 of the loopback interface. The default listener enables you to use Burp's browser to test virtually all browser-based web applications.
You may need to create or configure listeners when you test unusual applications, or work with non-browser-based HTTP clients. Use the Add and Edit buttons to open the Add a new proxy listener dialog. You can configure the proxy listener settings in the dialog tabs.
The Proxy listeners settings are project settings. They apply to the current project only.
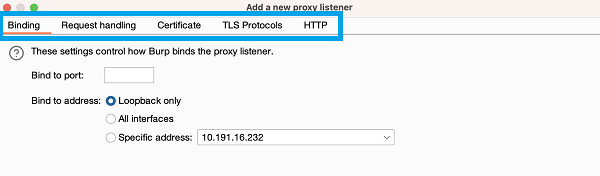
Binding
These settings control how Burp binds the proxy listener to a local network interface:
- Bind to port - Specify a port on the local interface. Burp opens the port to listen for incoming connections. Make sure you use a free port that has not been bound by another application.
-
Bind to address - Specify an IP address of the local interface for Burp to bind to. You have the following options:
- The loopback interface only.
- All interfaces.
- A specific local IP address.
Note
If the listener is bound to all interfaces or to a specific non-loopback interface, other computers may be able to connect to the listener.
Request handling
These settings control whether Burp redirects the requests received by the listener:
-
Redirect to host - Specify a host. Burp forwards every request to the host, regardless of the target requested by the browser.
- If you redirect requests to a server that expects a different
Hostheader to the one sent by the browser, you may need to configure a match and replace rule to rewrite theHostheader in requests.
- If you redirect requests to a server that expects a different
- Redirect to port - Specify a port. Burp forwards every request to the port, regardless of the target requested by the browser.
-
Force use of TLS - Enable this setting to use HTTPS in all outgoing connections, even if the incoming request uses HTTP.
- To carry out sslstrip-like attacks, use this option with the TLS-related response modification settings. This type of attack downgrades an application that enforces HTTPS to plain HTTP, for a victim whose traffic is unwittingly being proxied through Burp.
- Support invisible proxying - This setting enables non-proxy-aware clients to connect directly to the listener. For more details, see Burp Proxy: invisible proxying.
The redirection options can be used individually. For example, you can redirect all requests to a particular host while preserving the request's port and protocol.
Certificate
These settings control the server TLS certificate that is presented to TLS clients. You can use these settings to resolve some TLS issues that arise when you use an intercepting proxy.
Note
In Burp's browser, you may notice that HTTPS is struck-through in the address bar as a TLS alert. This alert arises because the browser detects that it is not communicating directly with the authentic web server. This isn't an issue: it's a result of deliberately proxying your traffic through Burp. You can ignore it and continue to use the browser as usual.
The following options are available:
- Use a self-signed certificate - If this option is selected, Burp presents a self-signed certificate to your browser. This always causes a TLS alert.
- Generate CA-signed per-host certificates - This is the default option. If selected, Burp creates a unique, self-signed Certificate Authority (CA) certificate on installation. The certificate is stored on your computer for use each time Burp is run. When your browser makes a TLS connection, Burp generates a TLS certificate for the host, signed by the CA certificate.
- Generate a CA-signed certificate with a specific hostname - Specify a hostname, which Burp uses to generate a single host certificate to use with every TLS connection. Use this option if you perform invisible proxying, as the client does not send a CONNECT request, so Burp can't identify the required hostname prior to the TLS negotiation.
-
Use a custom certificate - Load a specific certificate to present to your browser. Note that the certificate must be in PKCS#12 format with a
.p12file extension; certificates in.pfxformat are not supported. Use this option if the application uses a client that requires a specific server certificate with, for example, a given serial number or certification chain.
Related pages
TLS Protocols
These settings control the TLS protocols that Burp uses to perform TLS negotiation with the browser.
The following options are available:
- Use the default protocols of your Java installation.
- Use custom protocols. Select the required protocols from the list.
HTTP
This setting controls whether the proxy listener allows clients to use HTTP/2. It is enabled by default.
You may want to disable this in certain cases, such as when a client has problems with its HTTP/2 implementation.
This setting does not change the connection between Burp and the server. To learn how to change the connection between Burp and the server, see HTTP settings.
Request and response interception rules
The Request interception rules and Response interception rules settings control which messages are stalled for you to view and edit in the Proxy > Intercept tab.
Adding an interception rule
To add an interception rule:
- Select Intercept requests / responses based on the following rules to configure rules that determine which messages are intercepted.
- Click Add to open the Add request interception rule dialog.
-
Specify the details of the interception rule:
- Boolean operator - The operator that Burp uses to combine the rule to the rule above. You can choose from AND and OR.
- Match type - The attribute of the message that the rule attempts to match on. For example, the domain name, IP address, or protocol.
- Match relationship - This can be either Matches or Does not match.
- Match condition - The value that the rule uses when matching. You can use regular expressions to define complex matching conditions.
- Click OK to create the rule.
Burp applies the enabled rules to the message to determine whether it should be intercepted. Each rule is combined to the rules above in order, using the selected boolean operator.
Use the checkbox on the left of each rule to activate or deactivate it. You can also Edit and Remove rules, or reorder them using the Up and Down buttons.
Modifying intercepted messages
These settings enable you to avoid invalid requests and responses being issued when you modify an intercepted message.
-
Automatically update Content-Length header when the request / response is edited - Enable this setting to automatically update the
Content-Lengthheader with the correct length of the message's HTTP body. This is normally essential when the HTTP body is modified. -
Automatically fix missing or superfluous new lines at end of request - Enable this setting to automatically correct common mistakes that are made when requests are edited in the interception view:
- Burp adds a blank line following the headers if there is not one already present.
- Burp removes any newline characters at the end of a body containing URL-encoded parameters.
Related pages
The Request and response interception rules settings are project settings. They apply to the current project only.
WebSocket interception rules
These settings control which WebSocket messages Burp holds for viewing and editing in the Intercept tab:
- Intercept client-to-server messages.
- Intercept server-to-client messages.
-
Only intercept in-scope messages. Select this setting if you only want to intercept WebSocket messages where the
upgraderequest is within the target scope of the project. Out-of-scope messages will not be held. Deselect this setting if you want to intercept all WebSocket messages, regardless whether they are within your project's target scope or not.
The WebSocket interception rules settings are project settings. They apply to the current project only.
Response modification rules
These settings control whether Burp automatically rewrites the HTML in application responses.
You can use the following settings to remove client-side controls over data:
- Unhide hidden form fields. You can also select Prominently highlight unhidden fields, for easy identification on-screen.
- Enable disabled form fields.
- Remove input field length limits.
- Remove JavaScript form validation.
You can use the following settings to disable client-side logic for testing purposes:
- Remove all JavaScript.
- Remove <object> tags.
Note
These features are not designed to be used as a security defense in the manner of, for example, NoScript.
You can use the following settings to deliver sslstrip-like attacks against a victim user whose traffic is unwittingly being proxied via Burp. Use these settings with the listener's Force use of TLS setting to effectively strip TLS from the user's connection:
- Convert HTTPS links to HTTP.
- Remove secure flag from cookies.
The Response modification rules settings are project settings. They apply to the current project only.
HTTP and WebSocket match and replace rules
The HTTP match and replace rules and WebSocket match and replace rules settings automatically replace parts of messages as they pass through the Proxy.
Configure these rules here or under Proxy > Match and replace. For more information on adding or editing rules, see Match and replace.
The Match and replace rules settings are project settings. They apply to the current project only.
TLS pass through
TLS passthrough sends traffic through Burp Suite without decrypting it or altering it in any way. This has three major benefits:
- Performance improves dramatically.
- Servers see the browser's original TLS fingerprint, which enables you to bypass some anti-bot defenses.
- You can eliminate TLS errors on the client. For example, in mobile applications that perform TLS certificate pinning.
If the application accesses multiple domains or uses both HTTP and HTTPS connections, you can pass through TLS connections to specific problematic hosts, and still work on other traffic as normal.
You can use TLS passthrough in two different ways:
- Add specific TLS passthrough targets.
- Apply TLS passthrough to all out-of-scope items.
Note
The Proxy intercept view and Proxy history do not display any details about requests or responses made via these connections.
Adding TLS passthrough targets
To add a new TLS passthrough target, copy the URL and then click Paste URL to add the relevant web server to the list. You can also configure the target manually:
- Click Add to display the Add TLS passthrough target dialog.
-
Specify the target details:
- Host or IP range - This can be a regex or an IP range. Leave blank to match any item.
- Port - The port that TLS passthrough should apply on. Leave blank to match any item.
- Click OK to add the target to the list.
You can Edit and Remove targets from the list. To upload a CSV or text list of targets, click Load and select the relevant file from the dialog.
Select Automatically add entries on client TLS negotiation failure to add the relevant server to the TLS pass through list when a client fails a TLS negotiation. A TLS negotiation may fail, for example, if Burp's CA certificate is not recognized.
Applying TLS passthrough to out-of-scope items
You can apply TLS passthrough for out-of-scope items automatically when you set the target scope:
- From Target > Site map or Proxy > HTTP history, select the hosts you want to add to the target scope.
- Right-click your selection and select Add to scope. The Proxy history logging window appears.
- Click Yes to apply TLS passthrough for out-of-scope items.
This enables the following settings in the Settings > Proxy menu:
- Miscellaneous > Don't send items to Proxy history or live tasks, if out of scope.
- TLS pass through > Apply to out-of-scope items - this can only be enabled when the setting above is enabled.
Related pages
The TLS pass through settings are project settings. They apply to the current project only.
Default Proxy history message display
This setting controls whether the Proxy history message editor displays auto-modified, manually edited, or original messages by default.
You can configure the behavior for three types of messages:
- HTTP requests
- HTTP responses
- WebSocket messages
For each type of message, you can select one of the following default display options:
- Original - Display the message with no modifications.
- Edited - Display the manually edited message. For example, a message that you've intercepted and modified.
- Auto-modified - Displays the message with modifications automatically made by Burp. For example, through match and replace rules, session handling rules, or extensions.
The Default Proxy history message display settings are user settings. They apply to all installations of Burp on your machine.
Proxy history logging
Use this setting to manage whether Burp Proxy sends out-of-scope items to the history or live tasks when new items are added to the target scope. This enables you to avoid accumulating project data for out-of-scope items.
There are three options available:
- Stop logging out-of-scope items.
- Ask me what to do each time.
- Do nothing.
The Proxy history logging settings are user settings. They apply to all installations of Burp on your machine.
Default Proxy interception state
Use this setting to choose whether Burp Proxy interception is enabled by default when you start Burp.
There are three options available:
- Enable interception.
- Disable interception.
- Restore the setting that was selected in the Proxy > Intercept tab when Burp closed.
The Default Proxy interception state settings are user settings. They apply to all installations of Burp on your machine.
Miscellaneous
These settings control various aspects of Burp Proxy's behavior:
- Use HTTP/1.0 in requests to server - Enable this setting to use HTTP version 1.0 in requests to destination servers. This may be useful when working with legacy servers or applications that require version 1.0 to function correctly.
- Use HTTP/1.0 in responses to client - Enable this setting to use HTTP version 1.0 in responses. All current browsers support both version 1.0 and 1.1 of HTTP, however version 1.0 has a reduced feature set. A reduced feature set can help you to control aspects of a browsers' behavior, for example to prevent attempts to perform HTTP pipelining.
- Use keep-alive for HTTP/1 if the server supports it - By default, Burp reuses HTTP/1 connections for outbound requests from the proxy. This may improve browser load times.
-
Set response header "Connection: close" - Enable this setting to add or update the response
Connectionheader with the valueclose. This can enable you to prevent HTTP pipelining in some situations. -
Set "Connection: close" on incoming requests - By default, Burp adds or updates the request
Connectionheader with the valueclose. This can enable you to prevent HTTP pipelining in some situations. -
Strip Proxy-* headers in incoming requests - By default, Burp strips
Proxy-*headers from incoming requests. This prevents leakage of any information, as browsers sometimes send request headers containing information intended for the proxy server. A malicious website may attempt to induce a browser to include sensitive data within these headers. - Remove unsupported encodings from Accept-Encoding headers in incoming requests - By default, Burp removes encodings that cause problems when Burp processes responses. This reduces the chance that they are used. You may need to de-select this setting if a server requires an unsupported encoding.
- Strip Sec-WebSocket-Extensions headers in incoming requests - By default, Burp removes this header. This reduces the chance that extensions relating to WebSocket connections are used, as some encodings cause problems when processing responses in Burp. You may need to de-select this setting if a server requires a particular extension.
- Unpack compressed requests - Enable this setting to automatically unpack compressed request bodies, which are often present in applications using custom client components. Burp can unpack requests that have been compressed using gzip, Deflate, or Brotli. Note that some applications may experience issues if they expect a compressed body but the compression has been removed.
- Unpack compressed in responses - Enable this setting to automatically unpack compressed response bodies. Burp can unpack responses that have been compressed using gzip, Deflate, or Brotli. Note that you can often prevent servers from compressing responses - use a match and replace rule to remove the
Accept-Encodingheader from requests. - Disable web interface at http://burpsuite - This setting may be useful if you need to configure your listener to accept connections on an unprotected interface, and wish to prevent others gaining access to Burp's in-browser interface.
- Suppress Burp error messages in browser - Enable this setting to suppress the messages that are usually sent to the browser when errors occur. This may be useful if you wish to run Burp in stealth mode in order to perform man-in-the-middle attacks against a victim user.
- Don't send items to Proxy history or live tasks - If you enable this setting, Burp can't log requests in the Proxy history or send them to live tasks. This enables you to limit the memory and storage overhead. This may be useful, for example, if you are using Burp to authenticate upstream servers or perform match-and-replace operations.
- Don't send items to Proxy history or live tasks, if out of scope - If you enable this setting, Burp doesn't log any out-of-scope requests in the Proxy history or send them to live tasks. This enables you to avoid accumulating project data for out-of-scope items. This option is selected automatically when you set the target scope, and stop logging the proxy history for out-of-scope items.
The Miscellaneous settings are project settings. They apply to the current project only.